Art: Stolen, Escaped, Recovered- Drawing the Mona Lisa


Learning about the Mona Lisa fits our theme very well.  She was stolen, she was hidden, and she has been returned.  She's had quite an exciting life for a painting.
For this class we thought about where we would take the Mona Lisa to get out of the museum and have a little adventure for the day.  This is an idea I saw on Pinterest and fell in love with.  I can't take credit for it.  I did change it up a bit though and came up with my own lesson plan.  I had the students stick with charcoal, conte crayon, and/or brown chalks.  For the preschool class we kept it pretty simple. I showed them a poster of the Mona Lisa and told them she is famous for her "smile".  Do you think she is happy, sad, or just thinking?  What do you think she is thinking about?  Let's pretend that she is tired of hanging on the wall in the museum.  Where would you take her to have fun?  What do you like to do or what is your favorite place to go?


For the longer class we spent some time talking about Leonardo da Vinci's drawings and I shared a few pictures of those.  we talked about proportion/measuring objects by comparing them to the other objects around them, and shading.  We stuck with charcoal and brown chalks again to look like Leonardo's sketches. For these sketches we drew and shaded a stack of rocks.  You can see in the above photo one child's stack of rocks and his drawing of him with Mona Lisa.  (so cute!)  We also compared Leonardo's work to artists of an earlier time period to see the difference and why he was considered such a great artist.  


Also for the longer class we went into a little more detail of Mona Lisa's past.  She is 77cmX53cm and currently lives in the Musee du Louvre.  She was "born" about 1503-06.  Mona means "madam" in Italian.  In 1797 Mona Lisa was kidnapped as a prize during the French Revolution and taken to a new home at the Louvre.  According to www.arthistoryguide.com Napolean had her hung in his bedroom for a little while before taking her to the Louvre.  In 1911 a thief hid in a broom closet until the museum closed, stole Lisa, hid her in his jacket, and walked out the front door.  The thief, Vincenzo Peruggia, was caught in 1913 when trying to sell Mona Lisa to the Uffizi Gallery in Italy.  He felt Mona Lisa should be returned to her home country.  During World War II Mona Lisa was removed from the Louvre and hidden to keep her safe from invading armies.  There are a number of places mentioned online saying where she was hidden, but I don't know how credible those sources are.  In 1956 Mona Lisa was vandalized.  Someone threw acid at her and another time during the same year someone threw a rock at her.  Now she is protected behind climate controlled bullet proof glass.

So, if you are used to this exciting life and have been stuck inside in the same spot for a few decades, would you be a little bored?  Where would you take the Mona Lisa?  Just for a day.  Write your story.


(I love this- hey, come on, just hop in my mini-van)


Mona Lisa has probably always dreamed of being in a marching band spinning a flag :-)

Art: Stolen, Escaped, Recovered- Paintings

This lesson covered "stealing".  Not necessarily how you might first think.  We talked about stealing ideas and from other art.  Everyone gets ideas from somewhere and it's the combination of those ideas in your mind that makes them your own.  I used the example from Austin Kleon's book Steal Like An Artist, of the family tree analogy.  You have a mom and dad each unique, but together they make you.  You have a couple of ideas and when you put them together they make a new idea.  For the younger class we "stole" Van Gogh's idea of painting a vase of sunflowers.  We also looked at other artist's paintings of sunflowers.  Painting sunflowers is not a unique idea, but each artist paints the same thing differently.
 
When I asked my preschool class to go ahead and start painting the flowers one little girl did exactly what I said- so adorable!


The older class was asked to choose two pieces of art to combine into one.  When it came down to painting though, I think most of them changed their mind and just wanted to paint the sunflowers.  Not a problem for me though, the results were great.
(I can't believe I didn't take more pictures!  I had around 30 paintings...If anyone has some photos of more of our classes or at the art show please send them my way and I'll add them in)

In the older class we also talked about how to tell the real Rembrandt from the fake- something I found in a magazine while waiting at my teen's orthodontist appointment (link here) Rembrandt or...Not Rembrandt?


and this Norman Rockwell painting (the image is a link to the website where I found it and great blog for young kids and art) and a spin off by Luke Radi titled Spider-Man (image is a link).  We talked about what was similar and what was changed from the photograph to the painting to the next painting.
http://tinkerlab.com/looking-at-art-with-kids-norman-rockwell/
http://comicsalliance.com/best-art-ever-this-week-01-21-11/

When I do a painting class I usually give the kids the following colors and have them mix to make the other colors they need:
Magenta
yellow
cerulean
burnt umber (brown)
white
black
sometimes I'll add:
yellow ochre (golden brown)

ultramarine blue
red

It's just personal preference.  I think the cerulean makes a better range of greens and you can get the bright and light limes that are so much fun.  Using just ultramarine blue that usually comes in kits and starter sets is usually frustrating for young painters because it has so much black in it and the greens are always dark.  Just my opinion and observation- other people maybe would disagree.

Art: Stolen, Escaped, Recovered- Clues


If you are a detective what do you usually look for?  Clues.  This lesson's projects all have to do with clues.  What are somethings you would look for at a crime scene?  Fingerprints?  Footprints? 
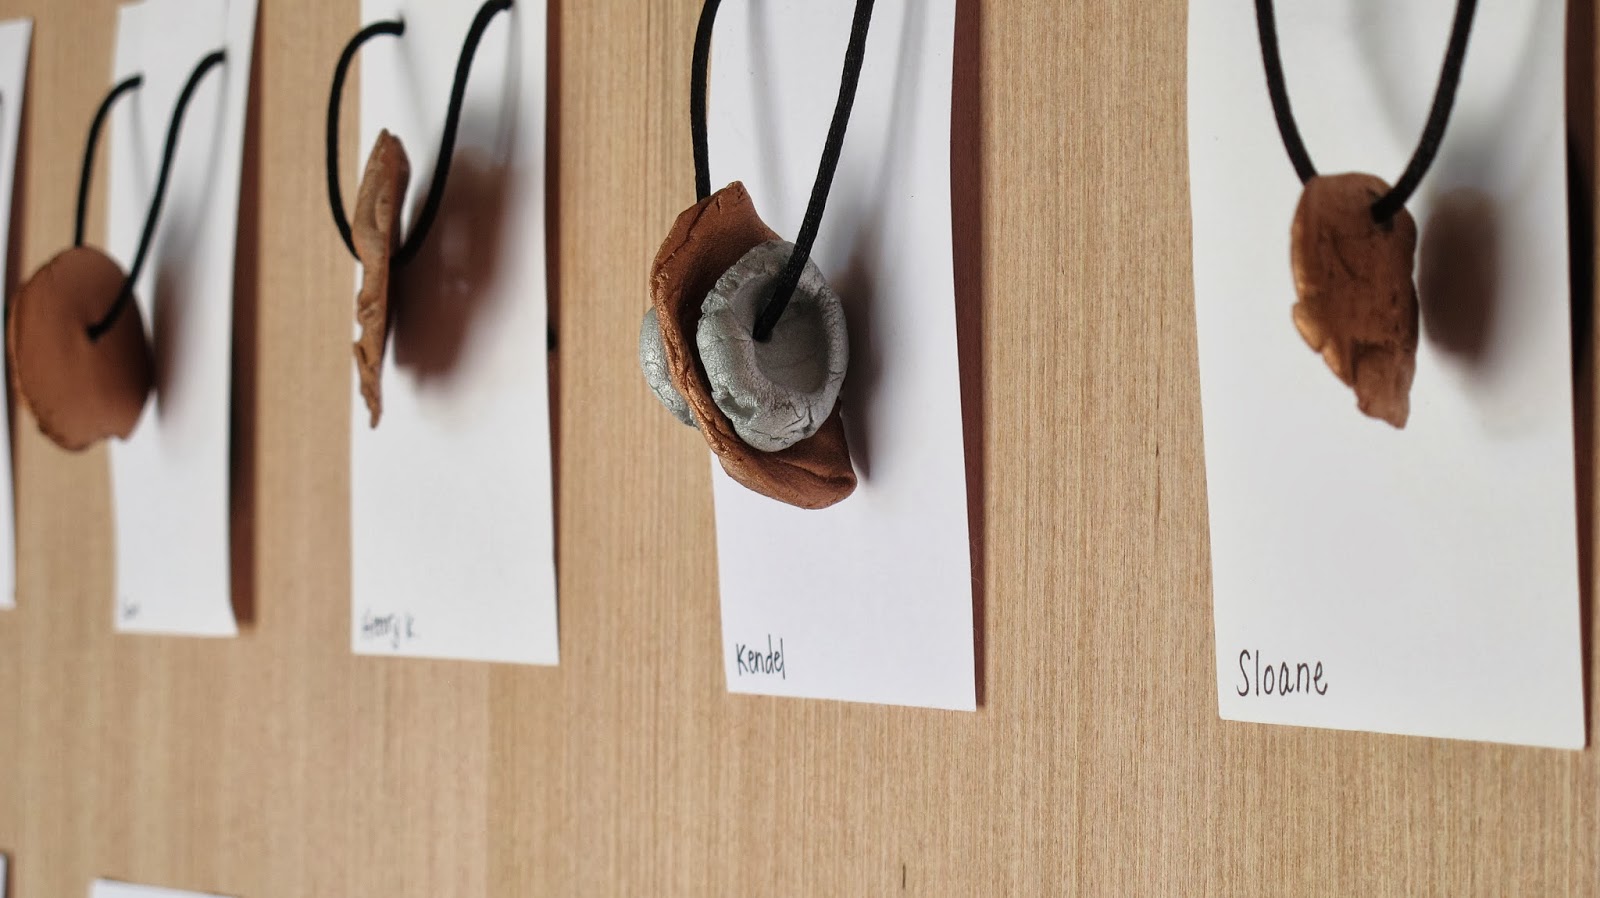
One of our projects for this lesson involves making fingerprint and footprint jewelry. 
We pinched a small piece of clay, rolled it in a ball, and pressed our finger in it or stepped on it, or found another object to leave a mark.  Don't forget to poke a hole at the top big enough to thread a string for a necklace.  We then set them on 3X5 cards labeled with each child's name and cut a piece of string the size each child wanted and set it on the card.  I also used dot stickers with each name folded over the string to help keep everyone's straight.  After class I spray painted the charms with copper or silver spray paint. 
Warning- keeping everyone's straight when spray painting can be a bit tricky so make sure you have your system down- I first tried leaving them on the card, but of course the spray paint paints over the name.  The clay is also very light weight, almost like paper, so sometimes the spray paint force blew the charms off of the card.  I lined each up and made a list of the order and just did a few at a time inside a box so I could do my best to remember whose were whose.  I still ended up with one no one claimed.
To display the jewelry I had clean 3X5 cards that I cut two short slits on one edge and at the end of those slits I hole punched a hole for the necklace string to rest.  I threaded the string through the hole of the charms. I put the string in the slits of the cards and then rolled the extra length of string on the back of the card and taped it down.  I didn't tie the ends because I figured the kids would want to when they take it home and want to wear it. 


Let's pretend you are an art forger.  An art forger is someone who makes art that looks like a famous artist might have made it and then tries to sell it saying it is that artist's work.  If we were going to do this we would need to make our art look old.  One thing that makes art age is the sun.
We picked two different colors of paper and cut a shape out of one.  we taped it to the other.  We hung them in my window for a day to see what happened.

Another aging technique we used was on metal.  We put a penny or piece of copper in a jar, a brass hook, a nut and screw in a jar.  We poured enough vinegar to cover the metal and then added salt.  I let the kids our in however much they wanted.  The next day the students came to class we checked on them.  They didn't look much different until we poured out the salt and vinegar and put the pieces of metal back in the jar.  once the air got to them they changed a lot.  (Hydrogen peroxide seemed to work fairly well to clean them off if you don't want to keep them rusty looking.  We kept ours rusty for the art show).


Now, if you worked in a museum and someone tried to sell you something they forged or made to look like a famous artist's work what could you do to tell the difference?  (listen to suggestions- some might be to look at the signature or to test the paint or compare styles of painting or brush strokes- all excellent answers).  Let's pretend we are museum directors and we are thinking about this piece of art.  We need to establish provenance.  Provenance is the origin or source.  It is the history of ownership of a valued object or work of art or literature.  To do this we are going to look at the back of a painting.  The back of a painting is just as important as the front.  Do the edges of the canvas look worn or freshly cut?  Is there a date or name stamped on the back?  Any labels?  Why might the brand and date of manufacture of the canvas be important?  Is it a brand the artist used?  Is it the same time period as the artist was living?  The back of a painting is a good place to look for clues.
We put together cardboard picture frames.  On the back we wrote a secret message or picture with a black light pen.  On the front we drew decoration around the edges with glue.  Once they were dry after class I spray painted them all with gold paint.  We used regular white glue and it dried mostly flat, so if I were to do this again and had a much smaller class of only older children who can handle a glue gun that would probably work better if you want a more prominent texture.  At the art show we had a black light flashlight hanging next to the frames so people could look at the back for "clues" as to who the artist is of the frame.


Fall Magnet Clay Project


Our first project this fall was clay magnets.  These are very simple projects.  I used white Staedtler Fimo Efaplast Microwave Modeling Clay I ordered from DickBlick.  I used ProMAG magnets also ordered from DickBlick.  I love this clay for making magnets.  In the summer we used it to make necklaces and this clay was great for drying so quickly, but it is very light weight and almost has a papery feel, so to me it felt weird to have it as a necklace kind of just floating around your neck... maybe other people didn't notice that or didn't care.  Anyway, because it is so light weight it is perfect for a magnet because then the magnet can do it's job holding a paper or photo on your fridge instead of holding up the magnet.
First we pinched off a piece of the clay.  We rolled it into a ball.  We flattened it and shaped it.  You can use a rolling pin if you want.


Then we pressed small items into the clay like plastic bugs, sticks, leaves, flowers, anything that might be found on the ground or under ground.  (The "under" part of our woodland theme).

I then microwaved the clay projects.  Because they are so small I only needed to cook them for a minute or two.  They will need to be allowed to cool.  I had the kids work on one then microwaved the projects while the kids worked on another project so they could be painting while the first project was cooking and cooling. 
we used crayola water color paints to paint them.  Spray painting is a nice option too, but the kids enjoyed being able to paint them themselves with lots of colors.
Last we glued a magnet to the back using good old Elmer's school glue.  It seems to have held up fine on my magnets, but if the magnet comes off you can always glue it back on, or use a stronger glue if you prefer.
 
The older class I taught also made owl magnets.  I found this idea on Pinterest here.
We added our own flair to it with the watercolor paints.
These would make great Thanksgiving napkin rings too.  Hope you enjoy a fun and easy project. :-)
 

Fall Woods Watercolor Paintings

Our second project for fall was watercolor painting.  We will be painting a picture of the woods, pretty much the same picture, each season, so we see how the same thing is different and the same throughout the year.  I think they will actually look quite nice together when we are done.
All of our paintings were done with Crayola watercolors on 18X24 140lb Canson cold press watercolor paper I purchased at Michael's (it's a large blue pad).  We used a variety of paintbrush sizes.  Larger to do a background wash, medium for smaller stuff, and small to tiny for details.  You will also need:  water for rinsing your brushes, paper towels, masking tape, a stiff board (I use clipboards), and salt (optional).
Before we started our paintings (with the older class/not preschool) we went over the color wheel, color mixing, watercolor washes, salt techniques, and the all important:  start with the lightest colors first and work your way to darker colors!  We made little bookmarks out of our practice strips.  The practice strips were leftover scraps after cutting everyone's paper from a larger piece.

First, using masking tape, we taped down all sides of our paper to a clipboard.  All the way around, not just on the corners.
Then we tore masking tape into thinner and crooked strips.  we placed these where we wanted tree trunks.  Once we were sure where we wanted the tape we smoothed and rubbed it down.
We got out our paints and painted away.  Some of us added a little salt or a few splatters. Once happy with our forest we used the hairdryer to dry our paintings.  Once the painting is dry we brushed off the salt and carefully peeled off the masking tape trees.

Here you can see the taped edges of a painting and some trees taped with the painting right over the tape and some of the tape trees taken off
We then painted our tree trunks, adding some dark lines for birch trees and some shading.  Once this part was dry we carefully peeled off the masking tape from around the edges.  I recommend doing this slowly and at an angle so you don't tear your painting.  Here's some of our finished projects.
(sorry this one is sideways- I can't get it to turn back)