Fall Magnet Clay Project


Our first project this fall was clay magnets.  These are very simple projects.  I used white Staedtler Fimo Efaplast Microwave Modeling Clay I ordered from DickBlick.  I used ProMAG magnets also ordered from DickBlick.  I love this clay for making magnets.  In the summer we used it to make necklaces and this clay was great for drying so quickly, but it is very light weight and almost has a papery feel, so to me it felt weird to have it as a necklace kind of just floating around your neck... maybe other people didn't notice that or didn't care.  Anyway, because it is so light weight it is perfect for a magnet because then the magnet can do it's job holding a paper or photo on your fridge instead of holding up the magnet.
First we pinched off a piece of the clay.  We rolled it into a ball.  We flattened it and shaped it.  You can use a rolling pin if you want.


Then we pressed small items into the clay like plastic bugs, sticks, leaves, flowers, anything that might be found on the ground or under ground.  (The "under" part of our woodland theme).

I then microwaved the clay projects.  Because they are so small I only needed to cook them for a minute or two.  They will need to be allowed to cool.  I had the kids work on one then microwaved the projects while the kids worked on another project so they could be painting while the first project was cooking and cooling. 
we used crayola water color paints to paint them.  Spray painting is a nice option too, but the kids enjoyed being able to paint them themselves with lots of colors.
Last we glued a magnet to the back using good old Elmer's school glue.  It seems to have held up fine on my magnets, but if the magnet comes off you can always glue it back on, or use a stronger glue if you prefer.
 
The older class I taught also made owl magnets.  I found this idea on Pinterest here.
We added our own flair to it with the watercolor paints.
These would make great Thanksgiving napkin rings too.  Hope you enjoy a fun and easy project. :-)
 

Fall Woods Watercolor Paintings

Our second project for fall was watercolor painting.  We will be painting a picture of the woods, pretty much the same picture, each season, so we see how the same thing is different and the same throughout the year.  I think they will actually look quite nice together when we are done.
All of our paintings were done with Crayola watercolors on 18X24 140lb Canson cold press watercolor paper I purchased at Michael's (it's a large blue pad).  We used a variety of paintbrush sizes.  Larger to do a background wash, medium for smaller stuff, and small to tiny for details.  You will also need:  water for rinsing your brushes, paper towels, masking tape, a stiff board (I use clipboards), and salt (optional).
Before we started our paintings (with the older class/not preschool) we went over the color wheel, color mixing, watercolor washes, salt techniques, and the all important:  start with the lightest colors first and work your way to darker colors!  We made little bookmarks out of our practice strips.  The practice strips were leftover scraps after cutting everyone's paper from a larger piece.

First, using masking tape, we taped down all sides of our paper to a clipboard.  All the way around, not just on the corners.
Then we tore masking tape into thinner and crooked strips.  we placed these where we wanted tree trunks.  Once we were sure where we wanted the tape we smoothed and rubbed it down.
We got out our paints and painted away.  Some of us added a little salt or a few splatters. Once happy with our forest we used the hairdryer to dry our paintings.  Once the painting is dry we brushed off the salt and carefully peeled off the masking tape trees.

Here you can see the taped edges of a painting and some trees taped with the painting right over the tape and some of the tape trees taken off
We then painted our tree trunks, adding some dark lines for birch trees and some shading.  Once this part was dry we carefully peeled off the masking tape from around the edges.  I recommend doing this slowly and at an angle so you don't tear your painting.  Here's some of our finished projects.
(sorry this one is sideways- I can't get it to turn back)


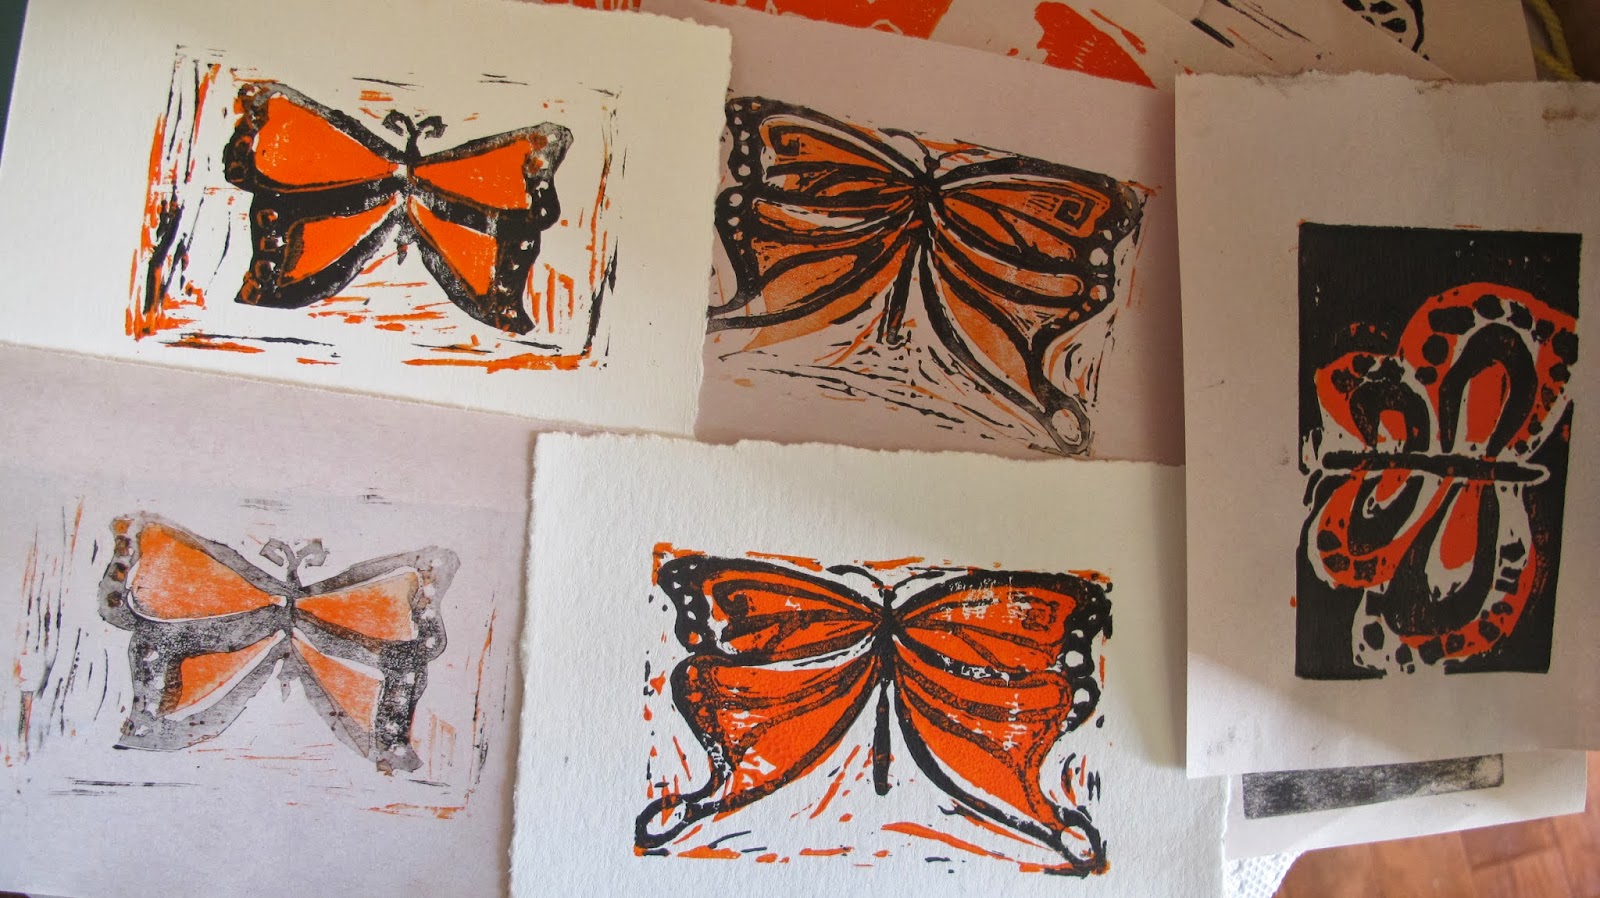
Monarch Butterfly Printmaking

I know, I know, I still haven't updated my blog with all of our summer projects we completed and our show.  Since it's fall I decided to skip ahead and then go back to those.  This school year I decided to do three classes each season.  I chose the theme Over, Under, and Through the Woods for the seasonal and outdoorsy art projects I wanted to do.
For our preschool class we made monarch butterflies using hand prints.  It's pretty self explanatory.  We painted our hands orange, pressed them on paper, painted black around them, and then added white dots.  For full disclosure, I did see this one on Pinterest (the link takes you to the google image).  We used tempera paint- I had the kids mix red or magenta and yellow to make orange.  Also, I only gave them the colors we were using so they wouldn't be tempted to use others and not have it look so much like a Monarch anymore.  In this class we only painted one hand and used the same hand to do both halves of the butterfly.  You can paint both hands so you have both prints and so the butterfly sides are symmetrical.  Either way is pretty cute.  Once we did our butterflies I gave the kids free reign with the paint on another sheet of paper to do whatever they wanted.


For the older class we had a much more complicated project.  We have done printmaking before with one block and one color of ink, but this time we needed two blocks, one for each color.  This took a lot of thinking ahead and planning for the kids.  Some still struggled with the concept at first, but after doing it a first time it makes more sense.
We started with me going through the whole process showing them my sketch, my already carved blocks, and my final prints along with a print of each block separate not just put together to help understand why we needed two separate blocks carved differently.
Step one:  Sketch your ideas for your butterfly.  Choose your design.  Know which parts you want orange and which parts black.  Remember that you will need to carve away anything you don't want printed.
Step Two:  Draw or transfer your black sections on one block and your orange sections onto the other block.  If you don't want to re-draw your sketch you can put your drawing face down on the block, hold it still, and rub your pencil over the back.  It should leave a light transfer of graphite on your block and then you can darken it if you need to.
Step Three:  Begin carving.  I recommend starting with a smaller blade to outline the areas you want to carve out and then using a larger one.  I also recommend holding the carving tool like you would an ice cream scoop -then the carving motion is a smooth glide.  Many students want to hold the carving tool like a pencil and that really is harder to get smooth cuts and results in more slips and scratching or cutting your other hand.  The carving blocks I used (link at the bottom of post) are really nice and smooth and easy to carve- no need to press extra hard.  Carving a block is actually a relaxing thing to do once you get the hang of it; and it doesn't take long to get the hang of it.


Step Four:  Once you have carved both blocks get ready to print.  I use a piece of plexiglass for rolling the ink.  I put a blob of black ink on one sheet of plexiglass and a blob of orange ink on another sheet of plexiglass.  I have two rollers, one for each color. (Click here for more pictures of how-to).
Step Five: I'd do orange first.  Roll the roller in the ink, getting it coated evenly (listen and feel that sticky sound- I love it!); then roll the roller over your block.
Step Six:  Carefully place a piece of paper over your block and rub over it with a baren.
Step Seven:  Carefully lift away the paper.
Now your orange design is printed! 
 

Next you will do the same, steps 5-7 with the block for your black sections with the black ink.


Supplies (links are for what I used):
carving block
carving tools
black ink
orange ink
ink plate/plexiglass
rollers
baren
newsprint
watercolor paper (or any paper you would like to use)
I used newsprint and watercolor paper so the students could see the difference in results depending on the paper.  I also used newsprint because it's inexpensive and the students could make as many prints as they wanted on the newsprint.  We used the newsprint for our sketches too.

Over, Under, and Through the Woods

I've decided this year to throw in a few classes during the school year.  There aren't very many, but there are a few art projects I've really been wanting to try out so we're going to.  You can check out the schedule tab to a get a full description. 
I do plan on posting pictures from this summer, but I've had a bit of computer troubles so I haven't gotten it done yet.  Once I get all my "technical difficulties" figured out I'll write all about summer classes; and the upcoming classes.

regestration deadline extended

I think I said the deadline would be May 1, but I think if you are like me you have been pretty busy and put it at the back of your mind so I'm extending the deadline until May 15.  That should still give me plenty of time to order supplies.  I have been busy spring cleaning and then, I think because it is still winter weather here in Minnesota, I also decided to completely rearrange the furniture in a handful of rooms in my house.  It's consumed my days, but I'm getting things put back together again and looking forward to some fun classes this June. :-)

Registration should now be working

Apparently there was a little glitch in registering, but my sister fixed for me. It should be up and ready to go now. If doesn't work please let me know and leave me a comment. Thanks!

The Gardner Museum news

Here's some art theft news you might find interesting if you are getting excited for our summer art lessons. I'm going to regret not writing more about the Gardner Museum, but I'm short on time today. I wanted to add this link and the video is better than what I would write anyway. :-) http://www.boston.com/metrodesk/2013/03/18/thieves-identified-gardner-museum-theft-rembrandt-and-vermeer-paintings/VmSiOGRgKbRakLJr1wCA3I/story.html