The Circus Art Show


After all our circus themed art lessons were through we put on a little show.  I hung up most of the art work in my garage.  Some students were not able to attend the show so they decided to take their art home at the end of each class.  This art show had some extra special features.  One was a friend of mine's daughter is into photography so I let her have a spot in the show to get a chance to display some of her art.  She took some great photos of our local town's fair.  She also helped with the set up of the show for the experience.  Thank you!
The other special extra everyone was invited to dress up.  Another was a show.  We set up a stage and let anyone who wanted get up and show off.  We had strong men, odd tricks, a magic trick, hula hooping, hand stands, and more.  I haven't edited the video yet (or figured out how to embed that in my blog) so maybe another time I'll get that up.
We had fun despite the terrible wetness and heat in the air.


circus parade sculptures

the stage area for showing off

Circus Parade


The first day of our week of circus art we started with sculpting animals, things, or people you might see in a circus parade.  We used Cloud Clay that I purchased from Dick Blick.  The colors we great and vibrant and easy to mix together to make new colors. 
To mix a new color you take some of two colors and knead them, squish them, stretch them together.  We came up with some fun swirl patterns too when mixing the colors. 
The clay is almost more of a foamy feel than a greasy feel you might get with other clays.  Cloud Clay is air dry so you don't need to bake it.  It dries quickly so you want to take a little at a time and keep what you aren't using in the package.  I put each pack inside a zip lock bag and sealed it while it wasn't being used to make sure it didn't dry out.  I let the kids pretty much do what ever they wanted and they didn't really need a lot of help- which was good because I stayed busy the whole hour of each class just passing out clay and putting it back in the bags.  Here's some results:  (sorry the last one is fuzzy- we had a very steamy day on our art show and I couldn't keep my camera lens from fogging up).


Posters!


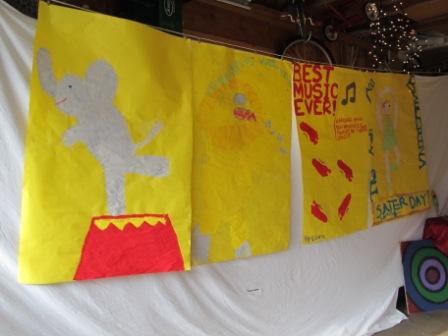
The next day of our circus/carnival themed art lessons was painting posters.  I ordered a large roll of yellow paper. The kind you typically see used for bulletin boards at school.  I asked the kids to paint a poster advertising for an act or performance at a circus or carnival.  I showed them some vintage circus poster examples online (googled images of vintage circus posters) so they would have an idea.  We don't see a lot of circus posters here in the suburbs.  I also showed them a couple of Toulouse Latrec posters and the classic "Chat Noir" (again googled images).  I emphasized making sure the most important words are largest and the rest are smaller.  I also pointed out how in the Chat Noir and in many toulouse latrec posters only a couple of colors are used and the posters really stand out -sometimes keeping it simple is a good idea.  I also demonstrated drawing a sketch of the poster first on scratch paper and writing out the words so you can find the center of the words, start in the middle and work your way to the sides so the words are centered.
After my intro I passed out the paint and let them go at it.  The older kids seemed to catch on, but for the younger ones that is getting a bit complicated.  If I had a class with all younger ones I skipped all the centering advice and just let them paint.
Improvising is okay- some kids made a mistake, like spilling or painting something different then how they wanted, but that's okay.  I spill can be turned into something else.  Or for example, my son wanted to paint two lions fighting, but painted one too big so he didn't have room for the other lion.  I gave him the option of starting over if he really wanted, what he thought he would have to do, or painting the other lion on another piece and then taping the two posters together for one giant poster.  He decided he liked it with one.  One looks great.  My point is be willing to be flexible and creative with what you have.
For this project we used tempera paint.  I have not always been a fan of tempera.  It always seems to dry way lighter and powdery.  It's pro is it is thicker than water colors so it is easier for young children to use, is washable, and is cheaper than acrylic paints and that's why I decided to go with it for this project.  I am now going to have take back my comment that Crayola has the best art products.  I bought the Dick Blick brand tempera paints and am amazed!  The Dick Blick tempera has great colors, great for mixing, nice and bright, and they didn't fade when dry.  I highly, highly recommend them. I am very excited about this product. :)  We will be using it again for our next set of lessons coming up.
Using big bright yellow pieces of paper was a lot of fun.  I love the pictures of the kids busy working so hard to create their fun ideas of a circus down on paper.


Circus Drawings


Many artists in the late 1800's and early 1900's seemed to be inspired by performers in circus and vaudville acts.  Degas, Seurat, Charles Demuth, Alexander Calder to get you started.  You can even watch the circus act Calder sculpted in action in a video on youtube.  We mostly focused on Seurat's "Circus"  and also discussed pointillism.  My hope was the children would try it, but I didn't force anyone into it.  I did push the children to fill in the entire piece of paper.  We used colored pencils or oil pastels on small pieces of paper (4"X6" and 4"X4") and drew pictures of -you guessed it, circus acts.
A tip for doing pointillism (or impressionism too) with oil pastels is to remember to push and lift with the crayon so the paint will stick rather than trying to just poke or dot the paper or color with them like crayons.
Here's some photos.  Sorry the ones taken at the art show are a little fuzzy- it was super humid that day and I could not keep my camera lens from fogging up even for a few seconds to take a photo.


Venetian Carnival Masks


There's something about making a mask that is intriguing.  I showed the kids some examples of Venetian Carnival masks (google images of...).  Some children had not heard of Venice so once again we googled images of..., Venice this time- having a lap top has come in handy. :)  It was fun to hear the kid's amazement when seeing pictures of such a, well, imaginative place. 
We used tempera paints, glues, yarns, ribbons, glitter, fake flowers, feathers, whatever odds and ends seemed to be good for this out of my craft bucket.
I bought some confetti glue and some teenage girls I had in my class figured out that if you just take the lid off and use a brush to paint the confetti glue on instead of trying to squeeze it out you have more control.  You do have to watch it drying though because it will drip down the curves of the masks. 
Once again I am going to rave about Dick Blick- at the craft stores here you can buy plastic masks, but Dick Blick sells a nice white paper mask.  With plastic you would need to prime it first so paint will stick, but with the paper masks we could paint right onto them and glue on them without worrying about whether or not the paint or glue would stick.  We were also able to poke holes with a thick needle to stick feathers in so they stand up straight like some kids wanted or able to use a hole punch if anyone wanted to tie on ribbon.