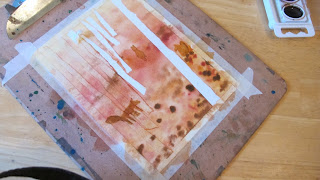
All of our paintings were done with Crayola watercolors on 18X24 140lb Canson cold press watercolor paper I purchased at Michael's (it's a large blue pad). We used a variety of paintbrush sizes. Larger to do a background wash, medium for smaller stuff, and small to tiny for details. You will also need: water for rinsing your brushes, paper towels, masking tape, a stiff board (I use clipboards), and salt (optional).
Before we started our paintings (with the older class/not preschool) we went over the color wheel, color mixing, watercolor washes, salt techniques, and the all important: start with the lightest colors first and work your way to darker colors! We made little bookmarks out of our practice strips. The practice strips were leftover scraps after cutting everyone's paper from a larger piece.
First, using masking tape, we taped down all sides of our paper to a clipboard. All the way around, not just on the corners.
Then we tore masking tape into thinner and crooked strips. we placed these where we wanted tree trunks. Once we were sure where we wanted the tape we smoothed and rubbed it down.
We got out our paints and painted away. Some of us added a little salt or a few splatters. Once happy with our forest we used the hairdryer to dry our paintings. Once the painting is dry we brushed off the salt and carefully peeled off the masking tape trees.
 |
| Here you can see the taped edges of a painting and some trees taped with the painting right over the tape and some of the tape trees taken off |
 |
| (sorry this one is sideways- I can't get it to turn back) |


No comments:
Post a Comment