
For our preschool class we made monarch butterflies using hand prints. It's pretty self explanatory. We painted our hands orange, pressed them on paper, painted black around them, and then added white dots. For full disclosure, I did see this one on Pinterest (the link takes you to the google image). We used tempera paint- I had the kids mix red or magenta and yellow to make orange. Also, I only gave them the colors we were using so they wouldn't be tempted to use others and not have it look so much like a Monarch anymore. In this class we only painted one hand and used the same hand to do both halves of the butterfly. You can paint both hands so you have both prints and so the butterfly sides are symmetrical. Either way is pretty cute. Once we did our butterflies I gave the kids free reign with the paint on another sheet of paper to do whatever they wanted.
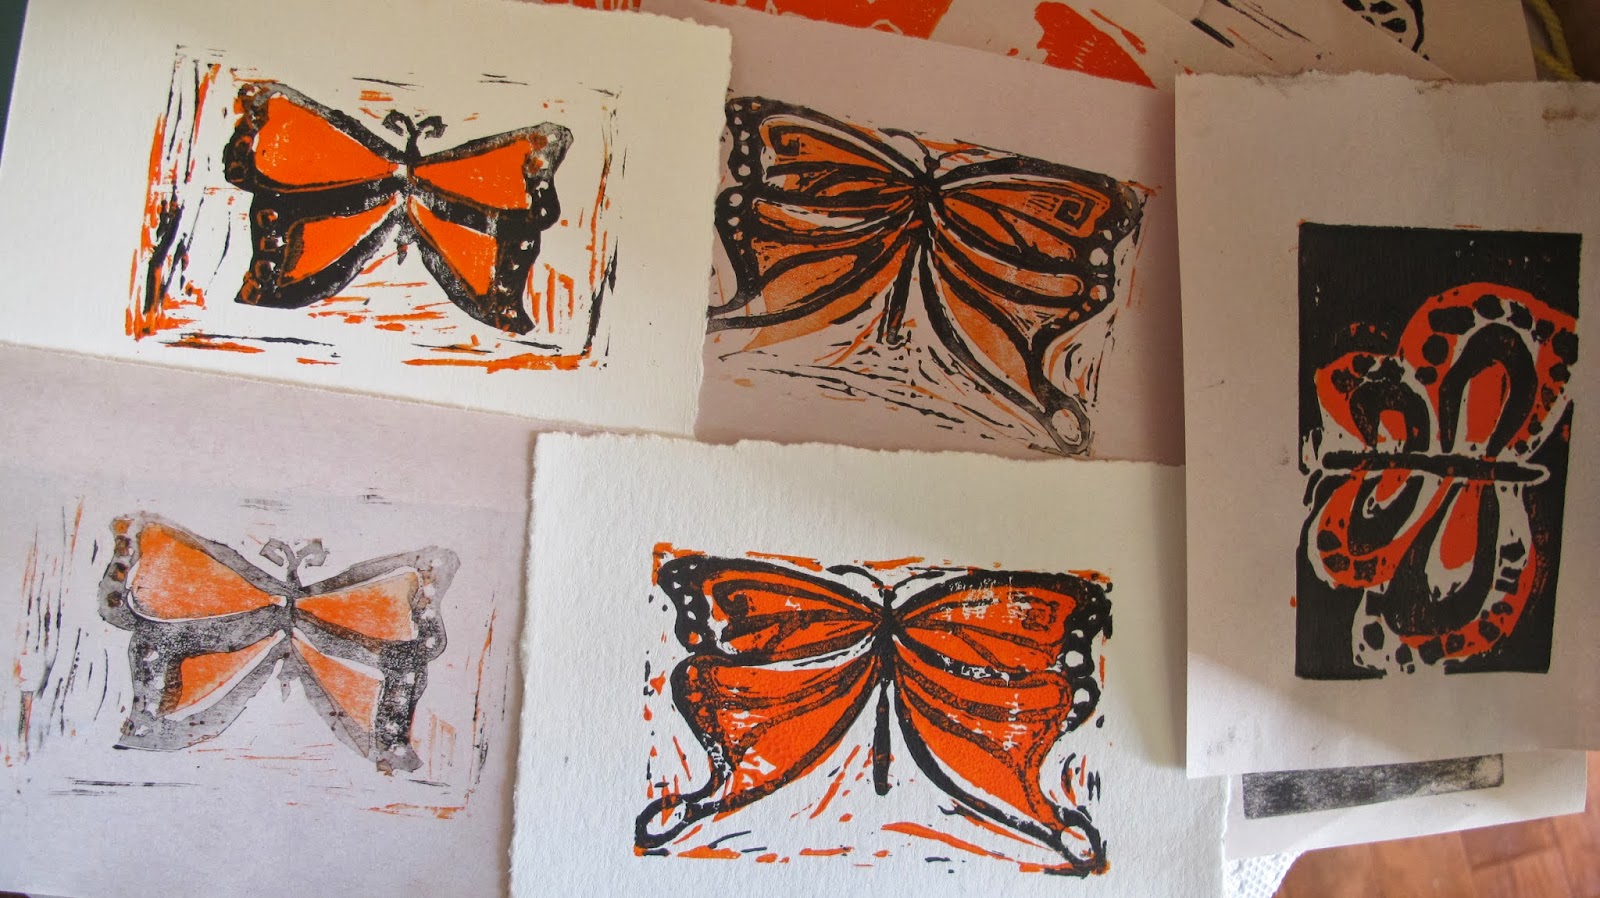
For the older class we had a much more complicated project. We have done printmaking before with one block and one color of ink, but this time we needed two blocks, one for each color. This took a lot of thinking ahead and planning for the kids. Some still struggled with the concept at first, but after doing it a first time it makes more sense.
We started with me going through the whole process showing them my sketch, my already carved blocks, and my final prints along with a print of each block separate not just put together to help understand why we needed two separate blocks carved differently.
Step one: Sketch your ideas for your butterfly. Choose your design. Know which parts you want orange and which parts black. Remember that you will need to carve away anything you don't want printed.
Step Two: Draw or transfer your black sections on one block and your orange sections onto the other block. If you don't want to re-draw your sketch you can put your drawing face down on the block, hold it still, and rub your pencil over the back. It should leave a light transfer of graphite on your block and then you can darken it if you need to.
Step Three: Begin carving. I recommend starting with a smaller blade to outline the areas you want to carve out and then using a larger one. I also recommend holding the carving tool like you would an ice cream scoop -then the carving motion is a smooth glide. Many students want to hold the carving tool like a pencil and that really is harder to get smooth cuts and results in more slips and scratching or cutting your other hand. The carving blocks I used (link at the bottom of post) are really nice and smooth and easy to carve- no need to press extra hard. Carving a block is actually a relaxing thing to do once you get the hang of it; and it doesn't take long to get the hang of it.


Step Five: I'd do orange first. Roll the roller in the ink, getting it coated evenly (listen and feel that sticky sound- I love it!); then roll the roller over your block.
Step Six: Carefully place a piece of paper over your block and rub over it with a baren.
Step Seven: Carefully lift away the paper.
Now your orange design is printed!


carving block
carving tools
black ink
orange ink
ink plate/plexiglass
rollers
baren
newsprint
watercolor paper (or any paper you would like to use)
I used newsprint and watercolor paper so the students could see the difference in results depending on the paper. I also used newsprint because it's inexpensive and the students could make as many prints as they wanted on the newsprint. We used the newsprint for our sketches too.
No comments:
Post a Comment